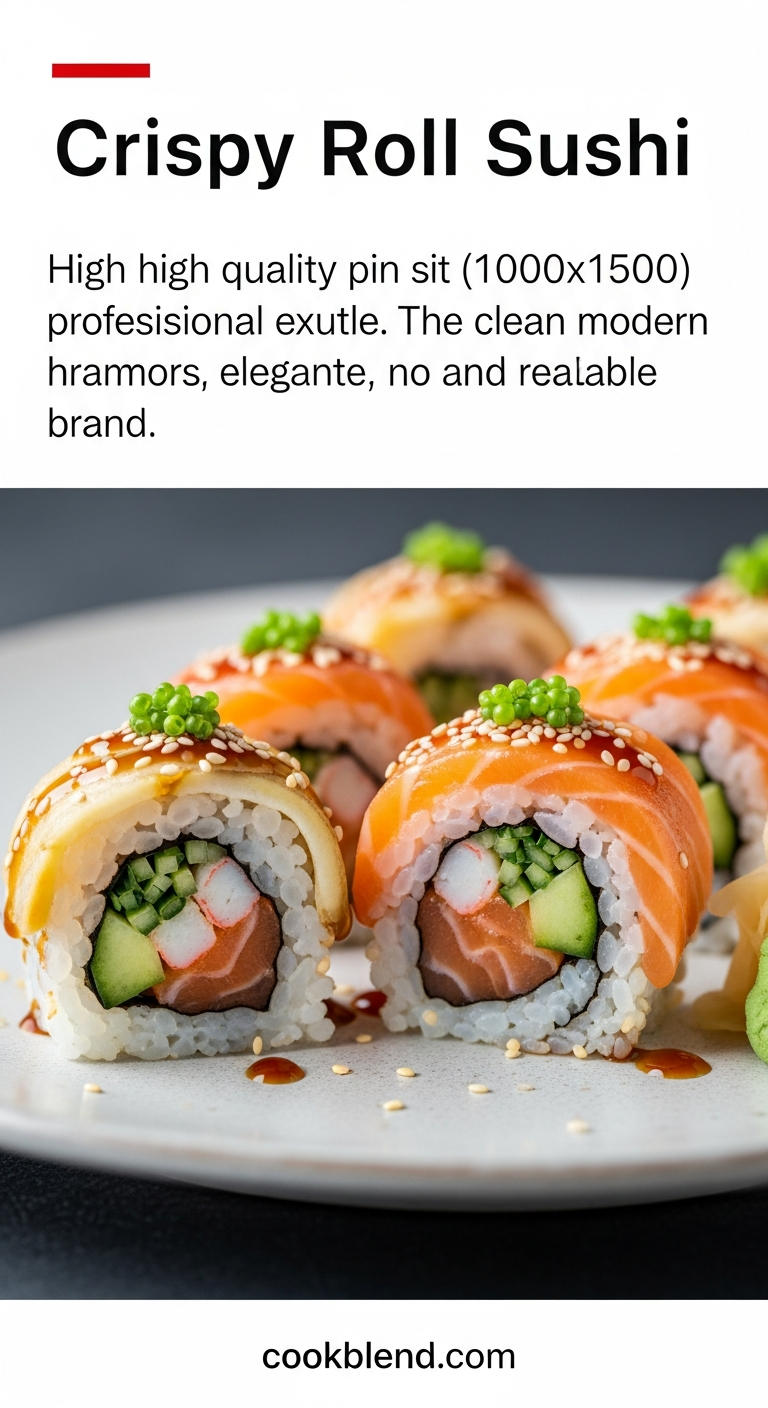
There’s something irresistibly satisfying about biting into a piece of crispy roll sushi-the delicate crunch giving way to a burst of fresh flavors wrapped snugly in seaweed and rice.Whether you’re a sushi enthusiast eager to elevate your home cooking or a curious foodie ready to explore new textures and tastes, mastering the art of crispy roll sushi opens up a world of culinary creativity. In this step-by-step guide, we’ll unravel the secrets behind that perfect golden crunch, from selecting the freshest ingredients to achieving flawless frying techniques. Get ready to embark on a flavorful journey that transforms simple rolls into crispy masterpieces worthy of any sushi bar.
Master the Art of Crispy Roll sushi begins with carefully choosing fresh, vibrant ingredients that promise not only extraordinary taste but unforgettable texture. Achieving the perfect crunch and delicate roll demands a blend of quality components and precise technique – this guide will walk you through every essential step to elevate your sushi-making experience.
Prep and Cook Time
- Preparation: 30 minutes
- Cooking (frying): 10 minutes
- Total Time: 40 minutes
Yield
Serves 4 (makes approximately 16 rolls)
Difficulty Level
Medium – Requires basic sushi rolling and frying skills
Ingredients
- 2 cups sushi rice, rinsed and cooked
- 2 ½ cups water (for cooking rice)
- ¼ cup rice vinegar
- 2 tbsp sugar
- 1 tsp salt
- 4 sheets nori seaweed
- 1 large avocado, sliced thinly
- 1 cucumber, julienned
- 8 oz sushi-grade salmon or shrimp, cooked and cooled
- 1 cup panko breadcrumbs
- 1 cup tempura batter (prepared according to package instructions)
- Vegetable oil, for frying (about 3 cups)
- Soy sauce, pickled ginger, and wasabi, for serving
Instructions
- Prepare the sushi rice: Rinse the sushi rice in cold water repeatedly until the water runs clear. Combine rice and water in a rice cooker or pot, then cook according to package directions. While warm, gently fold in a mixture of rice vinegar, sugar, and salt. set aside to cool to room temperature.
- Assemble the sushi rolls: Place a bamboo rolling mat on a flat surface and lay one nori sheet, shiny side down. With wet hands, spread an even ½-inch layer of sushi rice over the nori, leaving a 1-inch gap at the top edge for sealing.
- Add fillings: Arrange thin strips of avocado, cucumber, and sushi-grade salmon or shrimp along the bottom edge of the rice-covered nori. Avoid overfilling to maintain easy rolling and achieve the perfect texture.
- roll tightly: Using the bamboo mat,carefully lift the edge closest to you and roll forward,pressing gently but firmly to keep fillings intact. Seal with the exposed nori strip using a little water.
- Prepare for frying: Heat the vegetable oil in a deep pan or fryer to 350°F (175°C). Dip each roll carefully into the tempura batter, ensuring a thin, even coat, then roll it in panko breadcrumbs for added crunch.
- Fry to golden perfection: Gently place the coated rolls into the hot oil. Fry for 2-3 minutes, turning occasionally so the rolls brown evenly and achieve a deep golden crust. Remove and drain on a paper towel-lined plate.
- Slice and serve: Using a sharp, wet knife, slice each roll into 8 equal pieces to preserve the crisp texture.Arrange on a platter with soy sauce, pickled ginger, and wasabi for dipping.
Tips for Success and Variations
- Rice texture matters: Perfectly cooked and seasoned sushi rice is the foundation of a great roll.Avoid overcooking or under-seasoning.
- Keep hands wet: When handling rice,moist hands prevent sticking and aid in clean spreading.
- Tempura batter: Use chilled water or soda water for a lighter,crispier batter. Prepare just before frying for best results.
- Panko instead of regular breadcrumbs: The coarse texture of panko creates the signature crunch that elevates these rolls.
- Make-ahead tip: Prepare sushi rolls up to the batter step; refrigerate covered and fry within one hour to maintain freshness and texture.
- Creative fillings: Substitute your choice of protein-try spicy tuna, crab meat, or tempura vegetables for a delicious twist.
- Oil temperature control: Use a thermometer to maintain 350°F; too hot and rolls burn quickly,too cool and they absorb oil and lose crunch.
Serving Suggestions to Elevate Your Crispy Roll Sushi
Presentation is key for ultimate enjoyment. Arrange your crispy rolls on a long rectangular plate lined with bamboo leaves or a banana leaf for authentic flair. Garnish with thinly sliced radish, microgreens, and a drizzle of unagi sauce or spicy mayo for bold flavor contrasts.
Complement with a side of vibrant pickled vegetables or a refreshing seaweed salad to enhance textures and keep the palate intrigued. Serve a chilled glass of sake or green tea to round out the experience elegantly.

| Nutrient | Per Serving (4 rolls) |
|---|---|
| Calories | 320 kcal |
| Protein | 22 g |
| Carbohydrates | 35 g |
| Fat | 10 g |
For more on perfecting sushi rice and rolling techniques, check out our Ultimate Sushi Rice Guide. Expand your culinary horizons with expert tips from the Japan Guide’s sushi overview.
Q&A
Q&A: Master the Art of Crispy Roll Sushi – A Step-by-Step Guide
Q1: What makes a roll sushi truly “crispy”?
A1: The magic lies in the texture contrast. While customary sushi rolls are soft and tender,crispy roll sushi combines that classic chewiness with an irresistible crunch. This is often achieved by frying the entire roll or adding crispy elements like tempura flakes or fried onions, creating a delightful dance of textures in every bite.
Q2: Can I use any type of fish or filling for crispy roll sushi?
A2: Absolutely! One of the joys of sushi is its versatility. Whether you prefer salmon, tuna, crab, avocado, cucumber, or even cooked options like shrimp tempura, you can customize your crispy roll to suit your tastebuds perfectly. Just remember that some fillings hold up better to frying than others-stick to firmer ingredients to maintain structure.
Q3: what equipment do I need to make crispy roll sushi at home?
A3: While a bamboo rolling mat (makisu) is essential for shaping your rolls tightly,you’ll also need a sharp knife,a non-stick pan or deep fryer for crisping,and a bowl of water to wet your hands and knife to prevent sticking. If you want to get fancy, a rice cooker simplifies perfect sushi rice every time.
Q4: How do I prepare the sushi rice for the perfect crispy roll?
A4: Sushi rice is the foundation of any roll. Start by rinsing the rice repeatedly until the water runs clear to remove excess starch. Cook it perfectly sticky, then season with a mix of rice vinegar, sugar, and salt while it’s still warm. This balance of flavor and stickiness keeps your roll cohesive and flavorful.
Q5: What is the best technique for rolling sushi so that it doesn’t fall apart during frying?
A5: Firm but gentle pressure is key. Use your bamboo mat to roll the sushi tightly, ensuring all ingredients are snug. Wrapping the roll in a thin layer of nori (seaweed) helps hold it together. Some chefs recommend chilling the roll briefly before frying-it firms up the rice and filling, minimizing breakage.Q6: How do I get that perfect golden crisp without overcooking?
A6: Fry your sushi rolls at a consistent medium-high temperature-usually around 350°F (175°C). This ensures a speedy crisp without drying out the inside. Lightly coat your roll in tempura batter or panko breadcrumbs for an extra crispy, golden crust. Fry for just 1-2 minutes per side and drain on paper towels to eliminate excess oil.
Q7: Any tips for serving and enjoying crispy roll sushi?
A7: Slice your rolls with a sharp, wet knife to avoid squishing the crispy coating. Serve immediately for maximum crunch, accompanied by classic garnishes like pickled ginger, wasabi, and soy sauce. For an extra flourish, drizzle spicy mayo or unagi sauce on top-not only do they add flavor, but also a lovely visual appeal.
Q8: Can crispy roll sushi be made vegan or vegetarian?
A8: definitely! Swap out fish for avocado, cucumber, sweet potato tempura, or even marinated tofu. Use vegan tempura batter and add crunchy veggies or nuts for texture. Crispy roll sushi’s golden crunch and creative fillings make it a hit with all kinds of diets.
Q9: How do I avoid common mistakes when making crispy roll sushi?
A9: Common pitfalls include rolling too loosely, overfilling, and frying at the wrong temperature. Keep your rolls tight but not overly stuffed, choose fillings that hold well under heat, and maintain a steady frying heat. Patience and practice are your best companions on this crispy sushi journey.
Q10: Why should I try making crispy roll sushi at home?
A10: Beyond the delicious outcome, making crispy roll sushi at home unlocks endless creativity and a satisfying hands-on experience. You control the ingredients, flavors, and textures, crafting personalized rolls that rival your favourite sushi spot-plus, you get to impress friends and family with your culinary flair!
Closing Remarks
Now that you’ve unlocked the secrets to crafting perfectly crispy roll sushi, it’s time to bring your newfound skills to the kitchen and let your creativity shine. from selecting fresh ingredients to mastering that delicate, golden crunch, each step adds a layer of delicious artistry to your sushi experience. Whether you’re impressing friends at a dinner party or indulging in a personal culinary adventure, these crispy rolls promise to elevate your sushi game to mouthwatering new heights. so roll up your sleeves, embrace the crackle, and savor every bite of the crispy masterpiece you’ve just created!