There’s something magical about the simple joys of childhood-the laughter,the carefree afternoons,and of course,the timeless flavors that have become synonymous with comfort and warmth. Few treats encapsulate this sweet nostalgia quite like the classic peanut butter and jelly sandwich.What if you could transform this beloved combination into a bite-sized cookie that captures all the familiar flavors in a delightful new form? Enter the peanut butter & jelly thumbprint cookie: a charming little morsel where buttery, nutty dough meets a burst of fruity jam nestled perfectly in its center. In this article, we’ll guide you through the step-by-step process of crafting these nostalgic treats, blending tradition with a touch of creativity, so you can indulge in a cookie that tastes just like a childhood memory baked fresh.
Sweet Nostalgia: How to Make Peanut Butter & Jelly Thumbprint Cookies
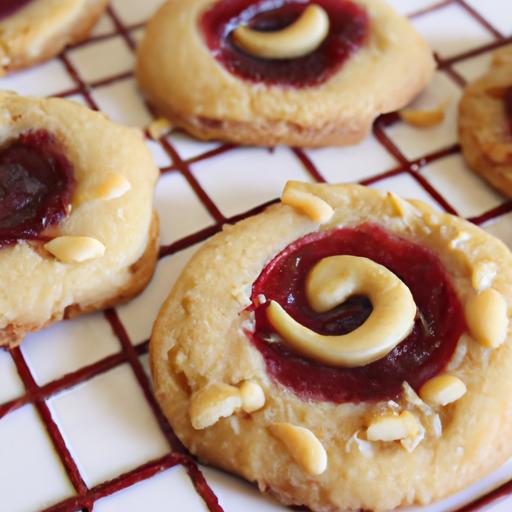
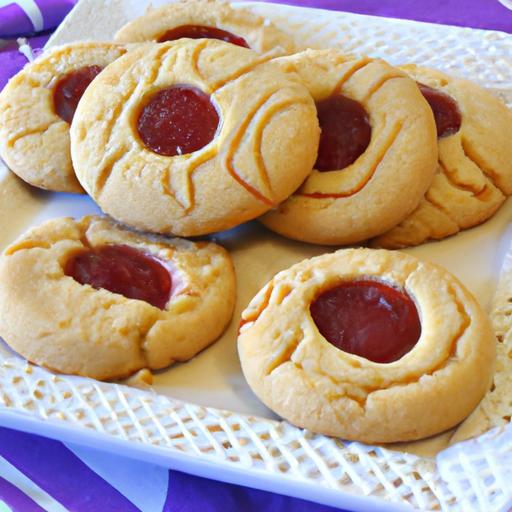
Few treats spark a sense of warmth and comfort quite like a classic peanut butter & jelly thumbprint cookie. This recipe is more than just a dessert-it’s a delightful memory wrapped in buttery peanut butter dough with a jewel-toned kiss of your favorite jam nestled right in the center. Embracing the perfect balance between soft, chewy texture and fruity sweetness can transport you back to childhood afternoons, where every bite felt like a hug from the inside.
Prep and Cook Time
- Planning: 20 minutes
- Baking: 12 minutes
- total: 32 minutes
Yield
Approximately 24 cookies
Difficulty Level
Easy
Gathering the perfect Ingredients for Classic Thumbprint cookies
to nail the sweet nostalgia of peanut butter & jelly thumbprint cookies, starting with high-quality ingredients is essential. Choose creamy,natural peanut butter free of hydrogenated oils-it ensures moistness and authentic flavor without grease separation. Use pure vanilla extract to enhance depth subtly. The foundation of any great cookie is fresh, all-purpose flour, sifted to prevent lumps and promote tenderness. Don’t overlook fine granulated sugar paired with a hint of brown sugar, wich lends subtle caramel notes and aids in creating the ideal chewiness. A pinch of kosher salt balances sweetness and heightens the nutty undertones. Lastly, select large, room-temperature eggs to help bind the dough and enrich the flavor with tender crumb consistency.
Mastering the Dough Texture for the Ideal Peanut Butter Base
The hallmark of these thumbprint cookies lies in thier tender yet chewy dough. Start by creaming softened peanut butter and sugars until light and fluffy-this aeration traps air bubbles for a more delicate bite. When folding in the sifted flour and salt, mix just until combined; overworking the dough can lead to toughness. The dough should feel soft and slightly sticky, yet firm enough to shape without cracking.Chill it briefly if your kitchen is warm to maintain structure during rolling. Creating uniform-sized balls ensures even baking, helping you achieve those signature rounded edges with a slight crack-a visual cue to a perfectly textured cookie.
Choosing the Best Jams and Jellies to Elevate Your cookies
The true magic happens in the center. Selecting vibrant, high-quality jams or jellies gives these cookies their burst of color and fresh flavor contrast. Customary choices like strawberry, raspberry, or grape jelly offer nostalgic familiarity, while more adventurous picks-such as blackberry preserves, cherry jam, or apricot marmalade-add a complex twist. For a silky finish, slightly warm the jam before spooning it onto your thumbprint indentations; this prevents cracking and lets it meld seamlessly into the dough. Avoid overly runny preserves, which can bleed during baking, and opt instead for spreads with a thicker set to keep your cookies looking as delightful as they taste.
Tips and Tricks for Baking Perfectly Soft and Chewy Thumbprints
Baking peanut butter & jelly thumbprint cookies to perfection requires control and a few insider tricks. Position your rack in the middle of the oven for even heat distribution. Utilize parchment paper or a silicone baking mat to prevent sticking without excess butter or grease. Bake just until the edges of the cookies turn golden and the centers remain soft-12 minutes is a great benchmark. Resist the urge to overbake, as these cookies continue to set once out of the oven, locking in softness and chewiness. For extra shine,brush the rims lightly with warmed jam right after baking. allow cookies to cool on the baking sheet for 5 minutes before transferring to a wire rack to avoid breakage.
Ingredients
- 1 cup creamy natural peanut butter
- 1/2 cup granulated sugar
- 1/2 cup light brown sugar, packed
- 1 large egg, room temperature
- 1 tsp pure vanilla extract
- 1/4 tsp kosher salt
- 1 1/4 cups all-purpose flour, sifted
- 1/2 cup jam or jelly (choose your favorite flavor)
Instructions
- Preheat the oven to 350°F (175°C). Line two baking sheets with parchment paper or silicone mats.
- In a large bowl, cream together peanut butter, granulated sugar, and brown sugar using an electric mixer on medium speed until light and fluffy, about 3 minutes.
- Add the egg and vanilla extract and beat until fully incorporated.
- Sift in the flour and kosher salt. Gently fold the dry ingredients into the wet until just combined. The dough should be soft but manageable.
- Roll dough into 1-inch balls and place them 2 inches apart on the prepared baking sheets.
- Use your thumb or the back of a teaspoon to press an indentation into the center of each ball, creating a “thumbprint.”
- Bake for 10 minutes, then remove from the oven and instantly fill each indentation with about 1/2 teaspoon of jam.Return the baking sheets to the oven and bake for another 2 minutes, or until edges are golden and jam is slightly set.
- Allow cookies to cool on the sheets for 5 minutes before transferring to wire racks to cool wholly.
Tips for Success
- Use room temperature eggs and peanut butter to ensure even mixing and smooth dough texture.
- For a nutty crunch, substitute half the peanut butter with almond or cashew butter.
- Chill dough for 30 minutes if it feels too sticky to handle or if your kitchen is warm.
- Store cookies in an airtight container at room temperature for up to 5 days, or freeze for longer keeps.
- Swap jam for melted chocolate or caramel for a decadent variation.
Serving Suggestions
Serve these cookies alongside a glass of cold milk or a warm cup of tea for an inviting snack. Garnish plates with fresh berries or a light dusting of powdered sugar for an extra touch of charm. These cookies also double as charming edible gifts-package them in pastel tins tied with twine for a sweet, nostalgic gesture that delights all ages.

| Nutrient | Per Cookie |
|---|---|
| Calories | 110 |
| Protein | 3g |
| Carbohydrates | 14g |
| Fat | 6g |
For more nostalgic treats to warm your heart, check out our Classic Peanut Butter Cookies recipe. To dive deeper into the science behind perfect cookie baking, visit King Arthur Baking’s Cookie Guide.
Q&A
Q&A: Sweet Nostalgia – How to Make Peanut Butter & Jelly Thumbprint Cookies
Q1: What exactly are peanut butter & jelly thumbprint cookies?
A1: Imagine the classic childhood PB&J sandwich, but reimagined as a bite-sized cookie! These thumbprint cookies are buttery, soft peanut butter delights with a little well in the center filled with your favorite jelly or jam. They capture that nostalgic flavor combo in a portable, sweet treat.
Q2: Why are they called ”thumbprint” cookies?
A2: The name comes from the technique used – you gently press your thumb (or a small spoon) into each cookie dough ball before baking to create a small indentation.This “thumbprint” is where the jelly is spooned in, giving these cookies their signature look and yum factor.
Q3: What kind of peanut butter works best for these cookies?
A3: creamy peanut butter is a classic choice because it helps the dough hold together nicely and creates a smooth texture. Though, if you like a bit of crunch and more texture, crunchy peanut butter can add an exciting twist. Just be mindful it might make the dough slightly more crumbly.
Q4: Can I use any type of jelly or jam for the filling?
A4: Absolutely! Grape jelly brings that traditional PB&J vibe, but don’t hesitate to experiment. Raspberry, strawberry, apricot, or even something exotic like blueberry or fig jam can add unique flavor profiles. The key is to use a thick, spreadable jam so it stays put during baking.
Q5: How do I prevent the jelly from melting and spreading too much in the oven?
A5: Using a firmer jam or jelly helps, plus avoid overfilling the thumbprint. A small dollop is enough. Also, chilling the cookie dough before baking solidifies the fat, helping the cookies keep their shape and hold the jelly nicely.
Q6: What’s the texture of these cookies like?
A6: They should be soft and slightly chewy with a tender crumb. The peanut butter provides a rich, moist texture, while the jelly center adds a sweet, sticky surprise with every bite. The combo is pure comfort – like a warm hug in cookie form.
Q7: Are these cookies gluten-free or adaptable for dietary restrictions?
A7: You can definitely make these gluten-free by substituting regular flour with a gluten-free all-purpose blend. just keep an eye on the dough consistency since gluten-free flours vary. For dairy-free versions, use a plant-based butter substitute. The recipe is versatile and welcomes customization!
Q8: Any tips for making these cookies extra special?
A8: sprinkle a pinch of flaky sea salt on top of the jelly right after filling to create a delightful sweet-salty contrast. Or roll the dough balls in chopped peanuts before pressing the thumbprint for a crunchy exterior. Pairing with a cold glass of milk or a cup of tea really brings out the nostalgic magic.
Q9: How should these cookies be stored?
A9: Store them in an airtight container at room temperature for up to 5 days. Because of the jelly, refrigeration might make them a bit firmer, but it’s fine if you prefer chilled cookies. Just bring them back to room temp before serving for the best texture.
Q10: Why do these cookies evoke such a strong sense of nostalgia?
A10: They’re a baked tribute to one of the most beloved childhood snacks: the peanut butter and jelly sandwich. By turning that familiar flavor into a charming little cookie, they transport you right back to carefree afternoons and cozy memories, all while satisfying your sweet tooth. Sweet nostalgia, one thumbprint at a time!
Concluding Remarks
As the final crumb of your peanut butter & jelly thumbprint cookie melts away, you’re left not just with a lingering sweetness on your tongue but with a warm wave of nostalgia-a playful nod to childhood afternoons and simple joys. These little bites of buttery, jam-filled delight remind us that some of the best memories are crafted from the simplest ingredients. So next time you crave a treat that’s equal parts comfort and creativity, reach for this timeless recipe. Sweet nostalgia is just a thumbprint away.