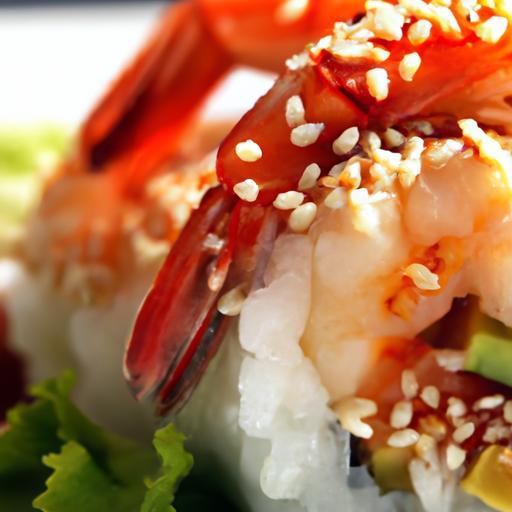

There’s something undeniably magical about sushi-the delicate balance of flavors, the artistry of its presentation, and the fresh, satisfying taste that transports you straight to the heart of Japanese cuisine. But what if you could bring that magic into your own kitchen without the fuss or the hours of planning? Enter quick & tasty shrimp sushi: a simple recipe that combines ease and elegance in every bite. Whether you’re a sushi novice or a seafood enthusiast, this guide will walk you through creating flavorful shrimp sushi that’s as delightful to make as it is to eat. Get ready to roll, dip, and savor a homemade sushi experience that’s both accessible and unforgettable.
Quick & Tasty Shrimp Sushi is a delightful way to bring the flavors of Japan right into your kitchen with minimal fuss and maximum satisfaction. from the pristine sweetness of freshly chosen shrimp to the delicate balance of seasoned sushi rice, this dish is an invitation to experience sushi as both an art and a comfort food favorite. Whether it’s your first roll or you’ve mastered nigiri, understanding how to select the perfect shrimp and mastering the rolling technique elevates your homemade sushi to restaurant-quality elegance.
Prep and Cook Time
- Preparation: 20 minutes
- Cooking: 10 minutes
- total Time: 30 minutes
Yield
Serves 4 (approximately 16 pieces)
Difficulty Level
Easy to Medium – Perfect for adventurous beginners and sushi enthusiasts alike
Ingredients
- 1 lb fresh shrimp, peeled and deveined
- 2 cups sushi rice, rinsed and drained
- 2 ½ cups water
- ⅓ cup rice vinegar
- 2 tbsp sugar
- 1 tsp salt
- 4 sheets nori (seaweed)
- 1 tbsp soy sauce, for brushing
- Wasabi paste and pickled ginger, for serving
- Bamboo sushi rolling mat (covered in plastic wrap)
- Sesame seeds (optional, for garnish)
- Fresh cucumber slices (optional, for crunch)
Instructions
- Cook the sushi rice: Combine rinsed rice and water in a pot. Bring to a boil, than reduce to low heat, cover, and simmer for 15 minutes. Remove from heat and let rest covered for 10 minutes.
- Prepare sushi vinegar: In a small bowl, whisk together rice vinegar, sugar, and salt until dissolved. Gently fold the mixture into the warm rice with a wooden spatula, taking care not to mash the grains. Allow the rice to cool to room temperature.
- Prepare shrimp: Bring a medium pot of water to a boil.Add shrimp and cook until pink and opaque, about 2 minutes. Drain and immediately transfer shrimp to iced water to stop cooking and maintain tenderness.
- peel and butterfly shrimp: Remove shells if not already done. Butterfly each shrimp by slicing lengthwise without cutting all the way through to flatten for rolling.
- Assemble sushi rolls: Place a nori sheet on the bamboo mat. With wet hands, spread an even layer of sushi rice, about ½ inch thick, covering approximately ¾ of the sheet, leaving the top edge clear.
- Add fillings: Lay 3-4 butterflied shrimp in a row across the rice, adding thin cucumber slices if desired.
- Roll sushi: Using the bamboo mat, gently lift and roll the sheet away from you, tucking in shrimp and cucumber as you roll. Press firmly but gently to seal the roll.
- Slice rolls: Using a sharp, wet knife, slice the roll into 6-8 pieces. Clean the knife between cuts to ensure smooth slices.
- Finish and serve: Lightly brush the rolls with soy sauce, sprinkle with sesame seeds as garnish, and serve with wasabi and pickled ginger.
Tips for Success
- Freshness is key: Choose shrimp labeled “sushi-grade” or “sashimi-grade” at your trusted seafood market to ensure the best flavor and safety.
- Rice texture: Sushi rice should be sticky but not mushy; avoid overmixing the seasoned vinegar to keep grains intact.
- Easy rolling: Don’t overstuff your rolls – that makes rolling tricky and can tear the nori.
- Knife care: Always keep your knife blade wet and sharp to achieve clean slices without crushing the roll.
- Make ahead: Prepare sushi rice and shrimp up to 2 hours before assembling.Keep rice covered with a damp cloth to preserve moisture.
Serving Suggestions
Present shrimp sushi on a sleek rectangular platter, arranged neatly with alternating cucumber garnishes for a splash of color. Accompany with small dipping bowls for soy sauce, dollops of fresh wasabi, and thin slices of pickled ginger to cleanse the palate between bites. A drizzle of unagi sauce or a sprinkle of togarashi can add an exciting twist for those craving bold flavors.

| Nutrition | Per Serving |
|---|---|
| Calories | 280 kcal |
| Protein | 22 g |
| Carbohydrates | 35 g |
| fat | 2 g |
For more sushi inspiration, check out our ultimate guide to perfect sushi rice. To deepen your understanding of seafood safety and quality selection, visit FDA’s seafood safety tips.
Q&A
Q&A: Quick & Tasty Shrimp Sushi – A Simple Recipe Guide
Q1: What makes shrimp sushi a great choice for beginners?
A1: Shrimp sushi is deliciously approachable-cooked shrimp means no worries about raw seafood safety, and its mildly sweet flavor pairs beautifully with sushi rice. Plus, shrimp’s firm texture holds up well, making the rolling process easier for sushi newbies!
Q2: How can I prepare shrimp sushi quickly without sacrificing taste?
A2: Start with pre-cooked shrimp (preferably butterfly-cut for easy rolling), sushi rice seasoned with a perfect balance of rice vinegar and sugar, and fresh, simple fillings like cucumber or avocado. Rolling tightly and using a bamboo mat speeds up the assembly, while dipping the finished sushi in a soy sauce and wasabi mix elevates every bite.
Q3: Do I need special ingredients or equipment to make shrimp sushi at home?
A3: Minimal gear needed-just a bamboo sushi rolling mat, a sharp knife, and a rice cooker or pot for perfectly cooked sticky rice. Ingredients include sushi-grade shrimp, nori sheets, sushi rice, rice vinegar, sugar, salt, and your choice of fresh veggies.These basics keep things straightforward and tasty.
Q4: What’s the best way to cook shrimp for sushi?
A4: If starting with raw shrimp, boil them briefly until they turn pink and curl slightly-about 2-3 minutes-then plunge into ice water to stop cooking and keep them firm. Alternatively, buy pre-cooked and butterfly them to ensure they lay flat on your sushi rolls. Avoid overcooking for tender, succulent bites!
Q5: Can I customize shrimp sushi to suit different tastes?
A5: Absolutely! Shrimp sushi is a blank canvas. Add spicy mayo, crisp tempura flakes, or even a drizzle of eel sauce for extra flair. For veggie lovers, include strips of bell pepper or pickled radish. The key is balancing flavors and textures, so experiment and find your perfect combo!
Q6: How do I store leftover shrimp sushi?
A6: Sushi is best enjoyed fresh, but if you must keep leftovers, wrap them tightly in plastic wrap and refrigerate for up to 24 hours. Avoid freezing as it changes the sushi rice texture. Before eating, let them sit at room temperature for 10-15 minutes for the best flavor revival.
Q7: Any tips to make my shrimp sushi look as good as it tastes?
A7: Presentation is part of the sushi experience! Use a sharp knife dipped in water to slice rolls cleanly without squashing them. Garnish with a sprinkle of sesame seeds or finely chopped green onions. Serve with vibrant pickled ginger, wasabi, and a small dish of soy sauce to complete that authentic visual appeal.
embrace the art of shrimp sushi with this quick and tasty guide-it’s your ticket to crafting homemade sushi that’s both satisfying and stunning!
To Wrap It Up
There you have it-a quick and tasty shrimp sushi recipe that brings the flavors of the sea straight to your kitchen without the fuss.With just a few simple ingredients and easy steps, you can craft sushi that’s as satisfying as it is notable. Whether you’re a seasoned home chef or a curious beginner, this guide proves that delicious homemade sushi is well within your reach.so grab your rolling mat, summon your appetite, and dive into the delightful world of shrimp sushi-because great taste never has to wait.